V-60HD: How to Capture, Import, and Use Still Images
The following information is from the V-60HD Owner's Manual.
If you would like more information on this topic, please contact support via Roland Backstage.
Firmware version 3.0 or later adds additional image formats to import and the ability to store the 2 images internally.
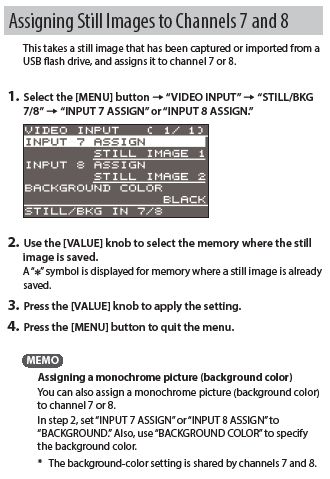
You can either capture or import up to 2 still images. These are accessible as inputs 7 and 8.
You can use them as a PGM, PVW, or DSK source.
When still images are stored internally, it will take a bit longer to boot the V-60HD when you power it on. You can delete still images in the menu.
While capturing or importing a still image, all video pauses on the V-60HD until it's completed.
This guide covers both capturing a still image from a video input source, and importing a still image via a USB flash drive.
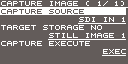
How to Capture a Still Image from a Video Input
- Press the [MENU] button
- Use the Value knob to select CAPTURE IMAGE
- Press <ENTER> to go into the capture image menu
- Use the Value knob to select CAPTURE SOURCE
- Press <ENTER> to go into the capture source menu
- Now use the value knob to specify the input video source to use for the still image capture
- Press the [VALUE] knob to apply the settings
- Use the Value knob to select TARGET STORAGE NO
- Press <ENTER> to engage settings
- Select STILL IMAGE 1 or STILL IMAGE 2 as memory slot for saving your still
(A * will identify the still storage location that is selected)
- Press the Value knob to apply the settings
- Select CAPTURE EXECUTE
- You should see a confirmation message appear
- Use the Value knob to select "YES" then press <ENTER> to carry out capture
- Press the [MENU] button to quit the menu
Note:
- If you capture from a source with HDCP, the still image is treated as copy-protected.
- If you turn off HDCP, the still image will be hidden.
- If you turn HDCP back on, the still image will need additional time to be loaded again.
More information on HDCP:
How to Capture a Still Image Using a Shortcut
You can also capture a still image by pressing and holding buttons 1 through 6 on the PGM and PST rows.
Pressing and holding PGM 1-6 will capture input 1-6 to Still Image slot 1.
Pressing and holding PST 1-6 will capture input 1-6 to Still Image slot 2.
How to Import an Image from a USB Flash Drive
Here are the recommended settings to import a still image via USB:
| Format |
Bitmap (.bmp), 24-bit color, uncompressed PNG (.png), 24-bit color * Alpha channel is not supported JPEG (.jpg), 24-bit color * The ".jpeg" file extension is not supported * .png and .jpg support requires version 3.00 or later |
| Resolution |
Matches the System Format: 720P = 1280x720 1080i/1080P = 1920x1080 |
| File Name |
No more than 8 single-byte alphanumeric characters * The extension ".bmp", ".png", or ".jpg" must be added |
Note:
- Large-size still-image files might take some time to import.
- When you’re using a USB flash drive for the first time, be sure to format it on the V-60HD.
- Depending on the USB flash drive, recognition of the flash drive might take some time.
- Save the still image in the root directory of the USB flash drive.
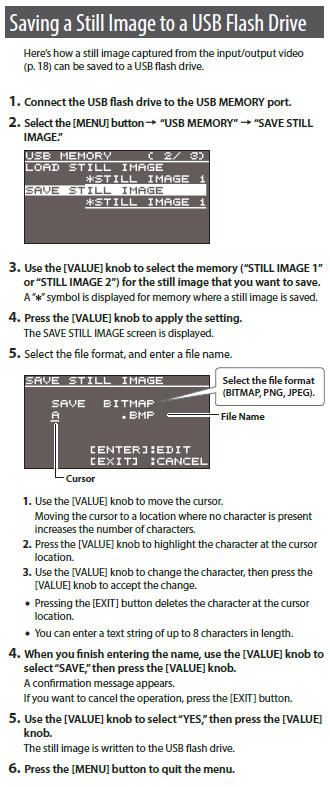
- Connect the USB flash drive containing the saved still image to the USB MEMORY port.
- Press the [MENU] button
- Use the Value knob to select USB MEMORY
- Press <ENTER> to go into USB MEMORY menu
- Use the Value knob to select LOAD STILL IMAGE
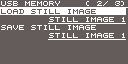
- Press <ENTER> to engage the settings on LOAD STILL IMAGE
- Use the Value knob to select STILL IMAGE 1 or STILL IMAGE 2 as the memory to save to
- Press the <ENTER>
- The USB LOAD screen appears with the names of the files on the USB flash drive
- Use the Value knob to select the still image file that you would like to import
- A confirmation message appears
- Use the Value knob to select YES and then press <ENTER> to confirm. This should import the still image into your unit.
- Press the [MENU] button to quit the Menu
Assigning Still Images to Channels 7 and 8
Deleting a Still Image
- Press the [MENU] button
- Use the Value knob to select “SYSTEM”
- Press <ENTER>
- Use the Value knob to select “DELETE STILL IMAGE.”
- Press <ENTER>
- Use the Value knob to select either "STILL IMAGE 1" or "STILL IMAGE 2" as the memory you want to delete.
An "*" is displayed to indicate a still image is saved to that still image memory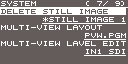
- Press the [Value] knob
- A confirmation message should appear to confirm that you want to delete.
- Use the Value knob to select "YES" then press the <ENTER>
- Still Image should be deleted at this step
- Press the [MENU] button to quit the Menu
Saving a Still Image to a USB Flash Drive