
VR-50HD: How to Setup and Use Flex Sources (MK I and II)
This guide covers how to setup and use flex sources with the VR-50HD. It covers the Mark I and Mark II versions, with a note for sections that are Mark II only.
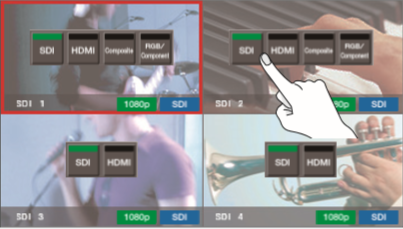
The VR-50HD is a 4 channel AV mixer, but each channel has more than one input.
- Channels 1 and 2 can be either HDMI, SDI, RGB/Component, or Composite
- Channels 3 and 4 can be either HDMI or SDI
How to Setup Input Assignments
To change the input source for a video channel, either:
Press [MENU] > [INPUT ASSIGN], or press the [INPUT ASSIGN] button on the panel
In this menu, you can change your video channel sources using the buttons on the LCD panel.
Note that if you change the source of an actively selected video input, it will briefly cut to black.
You can also use this menu to check the video resolution of your active sources.
MK II Only: You can also change the channel source by going to the Still / Input Source section of the panel and pressing the [SELECT] button until it turns red.
You can then use the [1] through [4] buttons to cycle through input sources.
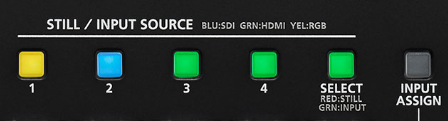
Blue - SDI
Green - HDMI
Yellow - RGB
Magenta - Composite
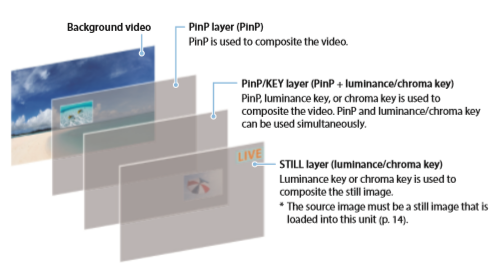
How to Use Flex Sources With Compositions
The nice thing about the input assignments as they don't disable the other inputs.
So while you only have four video channels to select, inactive sources can still be assigned to your PinP and PinP/KEY Composition layers.
Note that the STILL KEY layer is for still images only, and will not accept video sources.
For example, say you have 3 SDI cameras and 1 HDMI laptop running a presentation on input channels 1 through 4, but you need to add a 4th SDI camera to the production.
You can switch back and forth between SDI and HDMI on video channel 4 when you need that camera shot, but you can also assign the HDMI laptop to the PinP or PinP/Key Composition layer.
|
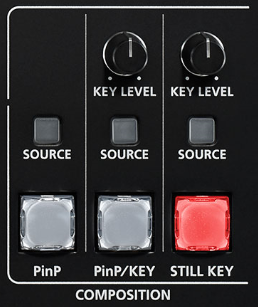
MK I only: In the Composition section of the panel, press the [ COMPOSITION SETUP ] button
|
MK II only: In the Composition section of the panel, press the [ SOURCE ] button of either PinP or PinP/Key
|
|
Composition Setup: Next, select the Composition Edit button (PinP, PinP KEY) you want to assign a source to, and press the [SOURCE] button. Source Setup: |
Source Setup: The VR-50HD MK II will go straight to the source selection for the Composition you selected. |


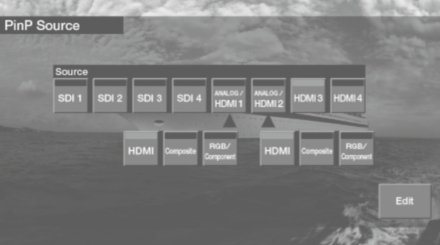
Once the source is selected, press the [DETAIL] button on the LCD panel to adjust the PinP settings.
In this menu, you can turn the PinP Window off by pressing the [ON/OFF] button on the LCD panel. Turning this off will bypass the window settings and display the source as full screen.
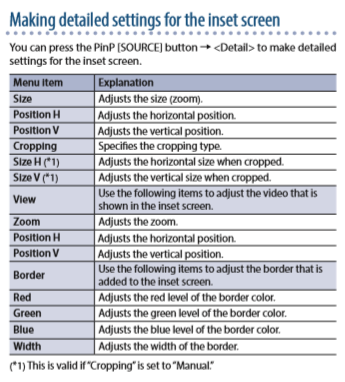
If you are editing the PinP/KEY detail menu, you can also adjust the Luma or Chroma Key settings as well on the 2nd page of the menu.
If you do not want to see the source in your Preview window on the Multi-view, go back to the Composition Setup menu, and in the lower left-hand corner of the menu, you can turn off the 3 effect layers in Preview.
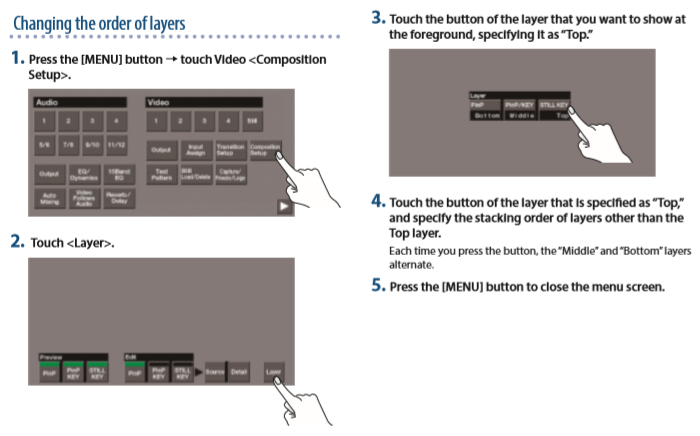
How to Adjust the Layer Order
The effect layers have a default order. So if you key parts of a layer, you will see images and video underneath in the following order:
You can also change the order of the layers in the menu:
More Information
For more information about the layer effects, refer to the Reference Manual:
Note that this is a separate document from the Owner's Manual, Startup Guide, or the RCS Owner's Manual.