
VR-1HD: How to Set Up Automatic Switching Including Video Follows Audio
If setting up Video Follows Audio and the audio settings for the first time, please see our guide on setting the Mic Gain by using the [ LEVEL SETUP ] button if you have not configured that yet.
Once your levels are calibrated, you can setup Video Follows Audio. If using Auto Scan or Beat Sync, you do not need to set the mic gain for this feature.
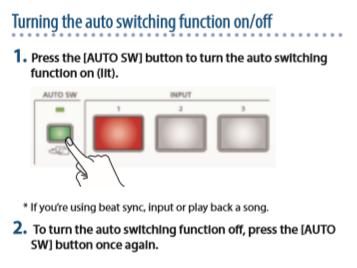
The Auto-Switching Function
This feature allows you to automate switching between channels, and there are three different modes: AUTO SCAN, BEAT SYNC, and VIDEO FOLLOWS AUDIO.
Switching at a specified interval (auto scan)
This automatically switches the video when a specified length of time elapses. You can change the duration that each video is shown, and also switch randomly between videos.
This is convenient when you want to switch between video signals of multiple cameras, for example when live-streaming a singer-instrumentalist.
- INPUT 1–3 are skipped if there is no video input.
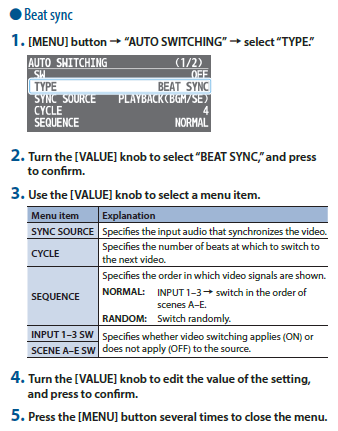
Switching in sync with the beat of the music (beat sync)
This detects the beat of the song, and automatically switches the video at intervals of the beat.
This lets you create video transitions that are synchronized with the music, for example when live-streaming a DJ performance or a musical performance.
- For some songs, it might not be possible to correctly detect the beat.
- INPUT 1–3 are skipped if there is no video input.
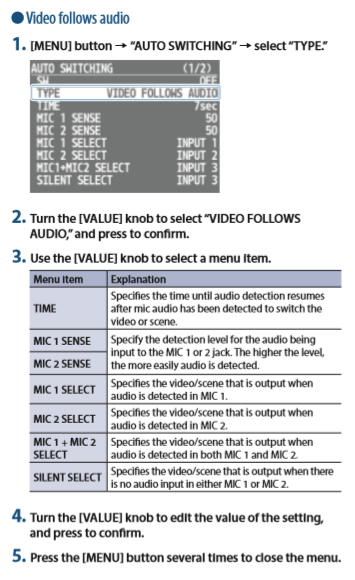
Switching according to the mic volume (video follows audio)
This detects the audio that is input from a mic, and automatically switches to the specified video according to the volume.
For example, if you’re streaming a talk show or a conversation, you can use this to switch between a closeup of the individual who is speaking and a wide shot of both people when neither person is speaking.
How to Configure Video Follows Audio
Video Follows Audio switches inputs automatically, based on the sound levels going into MIC 1 and MIC 2. In the LEVEL SETUP menu, you can set threshold levels for each microphone, and assign one of the 3 video inputs or 5 scene compositions to the following conditions:
| Menu Option | Description | Default | Suggested |
| MIC 1 SELECT | When Mic 1 is above and Mic 2 is below | INPUT 1 | Closeup 1 |
| MIC 2 SELECT | When Mic 2 is above and Mic 1 is below | INPUT 2 | Closeup 2 |
| MIC1+MIC2 SELECT | When Mic 1 and 2 are above thresholds | INPUT 3 | Scene C |
| SILENT SELECT | When Mic 1 and 2 are below thresholds | INPUT 3 | Wide Shot |
A typical setup would be your wide shot when both are below, then your close-up shots with their respective mics, followed by a vertical split (Scene C's default) when both mics are active.
You can also assign a still image loaded into your VR-1HD, or a solid color background.
The above is only an example, as the assignments and even the individual scene compositions can be edited in the menu.
 |
 |
How to Configure Auto Scan and Beat Sync

More Information
For more information about Auto-Switching, refer to the VR-1HD Reference Manual.
Note: This is a separate document from the Startup Guide and RCS Manual.