
V-8HD: How to Set Up an Audio Mix Minus
Note: Firmware version 2.00 adds new features to the AUX audio bus. This guide covers those new features.
The V-8HD is a powerful solution for productions that involve videoconferencing, with two Picture in Picture windows that can be used to create visually dynamic layouts when combined with robust Preset Memory recalls.
This video provides a brief overview of these features, which are available with firmware version 2.00 or later.
What is a mix-minus? It's basically a copy of your audio mix with one or more channels removed.
Some live event workflows need an audio mix-minus to create an alternate mix for either the in-house or live stream feed, or to minimize issues in videoconferencing workflows with audio feedback loops.
This guide contains two examples: How to create a mix-minus with the AUX audio bus to remove one or more sources from the alternate mix, and expanding on that with how to use a mix-minus in a videoconferencing workflow.
Creating A Mix-Minus
This is done by setting a video output's audio bus assignment to AUX and then muting the AUX Send for any audio channel you want to remove from the AUX audio mix.
In this example, we will set up HDMI output 2 for a mix-minus.
Assuming that HDMI output 1 is assigned to PGM, which is the default setting, we will change HDMI output 2 to PGM as well, and assign the AUX audio mix to it.
Note that the AUX audio bus is different than the AUX video bus, and can function independently with firmware version 2.00 or later.
Confirm the following settings:
Menu > 2: Video Output > Output 2 > Output Assign > PROGRAM
Menu > 9: Audio Output > Output Assign > HDMI Output 2 > AUX
(Reference Manual, page 38)
Next, press the Exit button once to go back a page and enter the AUX menu:
Menu > 9: Audio Output > AUX (submenu)
There are two submenus that are used to set up the mix-minus, AUX Send and AUX Effect:
Menu > 9: Audio Output > AUX > AUX Send (submenu)
By default, the AUX video bus selection determines which video input's embedded audio is sent to the AUX audio bus. By changing the setting from Auto to Manual, you can now control the individual send levels:
Menu > 9: Audio Output > AUX > AUX Send > AUX Send Video > Manual
- For each HDMI input you want to add to the AUX mix, change the send level from -INF to 0dB.
- You can also set the send level for the RCA audio input, which in most cases will be 0dB.
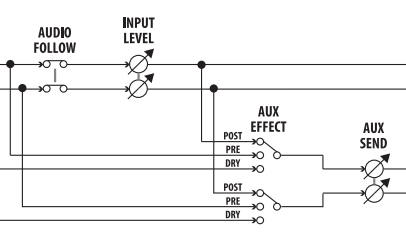
By default, the sends to the AUX bus are Pre Fader. This means that the Level setting for that channel in the main mix in the Audio Input menu does not affect the AUX send level.
Menu > 9: Audio Output > AUX > AUX Effect > Pre Fader, Post Fader, or Dry
- If you change the setting to Dry, this is another version of Pre Fader that will bypass any effects like EQ or Compression.
- If you change this to Post Fader, then the Level setting in the main mix will affect it.
- For example: In my main mix, HDMI In 6 has its Level set to 0dB. In my AUX mix, the send level for HDMI In 6 is also set to 0dB:
- Menu > 8: Audio Input > HDMI In 6 > Input Level > 0.0dB
- Menu > 9: Audio Output > AUX > AUX Send > HDMI In 6 > 0dB
- If I lower the input level to -3dB in the Audio Input menu, the AUX send will be lowered 3dB as well if it's Post Fader, but the send level will still be 0dB.
- For example: In my main mix, HDMI In 6 has its Level set to 0dB. In my AUX mix, the send level for HDMI In 6 is also set to 0dB:
For a more detailed look at the audio flow, please refer to the block diagram:

Mix-Minus For Videoconferencing
This example expands on the previous section. Imagine you're producing a video podcast, and you have three guests joining at the same time for your next episode.
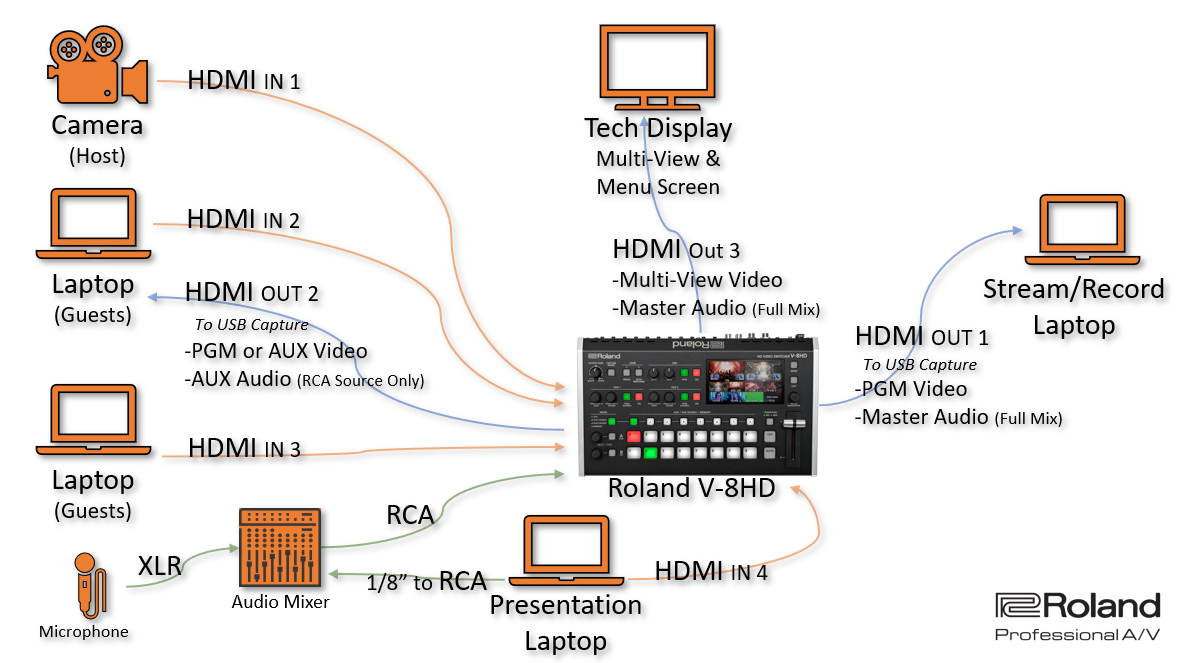
In this setup, you have the following:
- A camera for the host
- A microphone and a small audio mixer with XLR input and RCA outputs
- Two laptops to assign guests to picture in picture windows on the V-8HD.
- A UVC-01 USB Capture Device connected to one of these, so the guests can see the output of the V-8HD video mix.
- A third laptop with another UVC-01 USB Capture Device to record the main audio and video mix
- This laptop may also double as a presentation/playback source, if needed.
- But if possible, the presentation/playback source should be a fourth laptop.
For more information on Picture in Picture setup:
- Go to 14:25 in our Getting to Know Video
- V-8HD: How to Set Up and Use Picture in Picture Overlays
CONNECTING AUDIO SOURCES
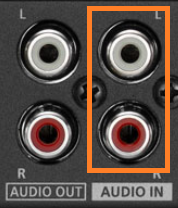
To start, connect a microphone to an audio mixer, and connect its RCA outputs to the RCA inputs on the V-8HD:
For the guest laptops, connect them to the V-8HD via HDMI, and turn on Audio Follows Video for each connected input:
MENU > AUDIO FOLLOW > INPUT X > ON
MENU > AUDIO FOLLOW > INPUT Y > ON
This ensures that you only hear the guest audio in your main mix when their camera is on the screen in the video mix.
- This works for both the sources selected as full screen program, as well as picture in picture windows, so this feature is recommended if managing multiple guests.
- If you are managing multiple guests off a single laptop, note that you will separately need to mute them in the conferencing software.
- If you have a separate laptop for each guest, this gives you more flexibility with the workflow, and you can assign different combinations of guests to different Picture in Picture preset memories.
Note that Audio Follows is after the AUX Send, but before the Input Level, so it will not mute the channel on the AUX audio bus.
HDMI OUTPUT SETUP
There are two ways to set this up, depending on what you want your guests to see.
To start, connect HDMI output 1 or 2 to a UVC-01, which turns the V-8HD into a webcam for the return video feed in the conferencing software.
Next, assign that same HDMI output to either Program video, so guests can see your show as viewers would, or AUX video so that guests only see you or another guest:
Menu > Video Output > Output 1 > Output Assign > Program
This output then needs to be assigned to the AUX audio bus to set up a mix-minus:
Menu > Audio Output > Output Assign > Output 2 > AUX
If you assigned the video output to the AUX video bus, you can change the video input assigned to the AUX video output using the Mode buttons in AUX Mode:

Then, in the AUX audio bus setup menu, adjust the AUX Send settings for the mix-minus, so the guests do not hear themselves:
Menu > 9: Audio Output > AUX > AUX Send > AUX Send Video > Manual
Menu > 9: Audio Output > AUX > AUX Send > HDMI IN X > -INF
Menu > 9: Audio Output > AUX > AUX Send > HDMI IN Y > -INF
If you want a guest to hear another guest with HDMI audio and they are unable to in the conferencing meeting, note that input selected for the AUX video bus contains the embedded HDMI audio that is sent to the AUX audio bus if the above AUX Send Video setting is set to Auto.
With AUX Send Video set to Manual and all 8 HDMI In set to -INF and Audio In to -0dB, this will route only your mic and analog audio mixer back to the conferencing software, so your guests do not hear themselves, or audio artifacts from the conferencing software's echo cancellation feature:
Menu > 9: Audio Output > AUX > AUX Send > AUX Send Video > Manual
Menu > 9: Audio Output > AUX > AUX Send > HDMI IN 1~8 > -INF
Menu > 9: Audio Output > AUX > AUX Send > Audio IN > 0dB
STREAM & RECORD IT ALL
If you want to stream and/or record the video mix and full audio mix, connect an HDMI output assigned to Program to a UVC-01 and laptop combo.
USB video signals can only be used by one software program at a time. So if you want to record Program output, you cannot use that signal in your videoconferencing software, and a separate computer is recommended.
Confirm that HDMI output is assigned to the main audio mix in order to record all the audio together, and have it follow the mix you setup in the Audio Input menu or Remote App:
Menu > Audio Output > Output Assign > Output Y > Master Output
Next, assign that same HDMI output to Program video, to ensure you are recording your main video and audio mix:
Menu > Video Output > Output Y > Output Assign > Program
Finally, test the mix-minus you created, and see if it is in sync with the video. If it is not, you may need to add delay to the AUX audio bus:
Menu > Audio Output > AUX > Delay > between 0 to 500 milliseconds
- This is separate from the individual audio input delays.
PRESENTATION & PLAYBACK SOURCES
If using Preset Memories during production, you may want to disable your preset recalls from changing your video and audio input and output settings on you.
If you intend for the above settings to be global audio settings regardless of the presets you choose during production, adjust the following settings:
MENU > PRESET MEMORY > LOAD PARAMETER / VIDEO INPUT > OFF
MENU > PRESET MEMORY > LOAD PARAMETER / VIDEO OUTPUT > OFF
MENU > PRESET MEMORY > LOAD PARAMETER / AUDIO INPUT > OFF
MENU > PRESET MEMORY > LOAD PARAMETER / AUDIO OUTPUT > OFF
MENU > PRESET MEMORY > LOAD PARAMETER / AUDIO FOLLOW > OFF