
VR-4HD: How to Set Up Audio
Introduction
The VR-4HD has multiple ways to connect audio sources:
- Analog XLR/TRS - This is a combo connector, meaning you can connect either 3 pin XLR cables, or 1/4" audio cables
- Analog RCA - These are the red and white phono connectors
- Digital HDMI - The video inputs also accept audio embedded within the video signal
- USB - This connector supports both audio input and output
This guide covers 2 different workflows:
- Using the VR-4HD to mix all of your audio
- Using an external audio mixer with stereo or mono output to the VR-4HD
Muting Audio Channels
The first thing you want to do when setting up a VR-4HD is to mute any audio channels you do not plan to use. In most cases, this is some or all of the HDMI inputs.
You can do this by turning the HDMI level knobs on the VR-4HD:
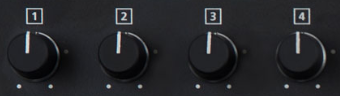
Note that these are not the same as the GAIN knobs located below these knobs.
Note that you can also use the Audio Mixer in the RCS software to adjust these settings.
You can also press the MUTE button on the VR-4HD and mute those inputs on the LCD screen. Note that you only want to mute the HDMI audio channels you are not using.
- If you plan to output a camera microphone or laptop audio via HDMI to the VR-4HD, do not mute that HDMI input.
- The Digital Gain setting for each embedded audio input is a pre-fader trim you can use to adjust the level before any EQ or Compressor processing.
Even if your HDMI source does not output any audio, it is recommended to mute that audio channel, because in some cases, the source may generate noise that will be part of your audio mix.
Muting unused analog input channels is generally not necessary, so long as the volume faders on the VR-4HD are turned all the way down for those channels:
Note that you can also use the Audio Mixer in the RCS software to adjust these settings.
Setting Up Microphones
This section covers microphones that are connected directly to the VR-4HD mic inputs. If you are using an external audio mixer, you can skip to the next section.
To set up a microphone, first you need to determine what type it is:
-
Dynamic
- These microphones need a lot of head amp (aka preamp) gain
- They do not need phantom power
-
Condenser
- These microphones need less head amp gain
- They are more sensitive to noises in the room
- They need phantom power
-
Lavalier
- These are clip on microphones
- The amount of head amp gain needed varies
- Wired
- These need less head amp gain
- Can be very sensitive to room and clothing noises
- They also need phantom power
- Wireless
- Head amp gain varies, because the level is also controlled via the mic belt packs
- In most cases, they do not need phantom power
- Wired
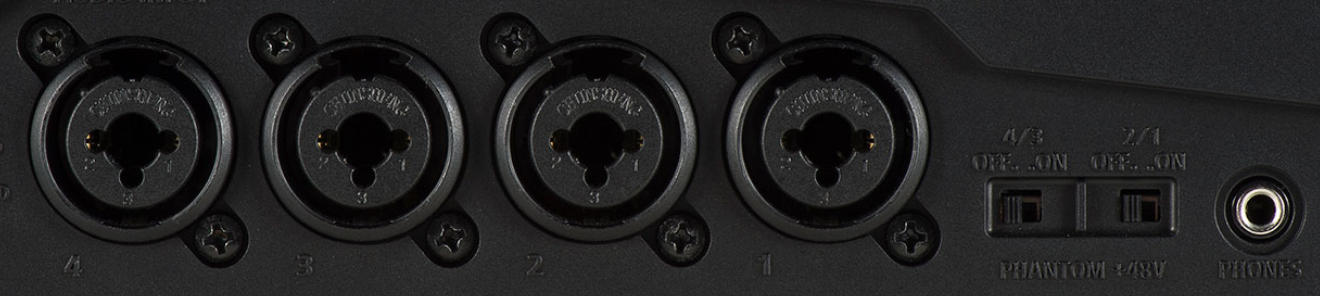
In this example, we connected a dynamic microphone to Audio Input 1, and a condenser microphone to Audio Input 2:
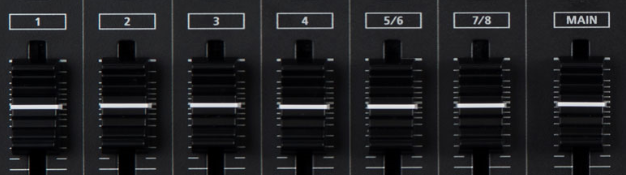
Once connected, turn up the audio level knobs for 1 and 2 and MAIN on the VR-4HD's audio mixer to the 0 dB, the bold line 3/4 of the way up:
Next, turn on Phantom Power for Input 2 using the switch on the left side, next to the headphone jack:
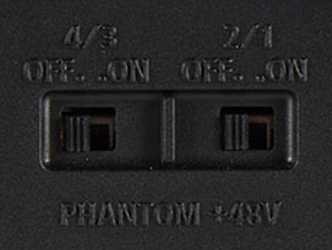
Note that Phantom Power is provided in pairs. If using a non-condenser mic on an input, check with the manufacturer if it is safe to use with 48V Phantom Power.
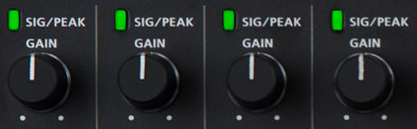
Next, set your Head Amp (aka preamp) gain by using the Gain knobs. This setting will vary, depending on the microphone, and the voice of the person using it.
Turn up the GAIN knob for each mic input until you get a good sounding level, and the SIG/PEAK LED is Green or Yellow, but not Red:
Each analog audio input channel has its own SETUP button, press it to open that channel's settings on the LCD screen:
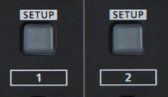
Note the HDMI audio has a SETUP button as well, but it is shared for all 4 HDMI audio inputs.

Here are some example settings to review on the LCD screen for the two different types of microphones in our example:
-
Dynamic Microphone
- Audio In 1 > Head Amp Gain > 50 dB
- Audio In 1 > Digital Gain > 0.0 dB
- Audio In 1 > Input Level > 0.0 dB
-
Audio In 1 > Pan > Center
-
Condenser Microphone
- Audio In 2 > Head Amp Gain > 35 dB
- Audio In 2 > Digital Gain > 0.0 dB
- Audio In 2 > Input Level > 0.0 dB
- Audio In 2 > Pan > Center
As a general rule, do not pan microphones that people are speaking into, your dialogue should be centered.
Also, do not adjust the Digital Gain setting, this is for advanced setups that need additional headroom for adding EQ and Compression. More info is in the Owner's Manual.
Setting Up An External Audio Mixer
To set up an external audio mixer, there are two ways to connect it.
XLR/TRS Inputs 1 and 2
This method preserves a balanced connection. XLR and 1/4" TRS connectors are balanced.
Balanced cables require balanced connectors and wiring on each end.
Note that TRS cables are very similar to TS cables, which are unbalanced:

Connect your audio mixer's left and right outputs to inputs 1 and 2 on the VR-4HD, using either XLR or TRS cables:
Next, bring the faders for channels 1, 2, and MAIN to the bold line 3/4 of the way up:
Next, press the input 1 and 2 SETUP buttons to open the channel settings on the LCD menu, and change or confirm the following settings:
- Audio In 1 > Head Amp Gain > 0 dB
- Audio In 1 > Digital Gain > 0.0 dB
- Audio In 1 > Input Level > 0.0 dB
-
Audio In 1 > Pan > Left
- Audio In 2 > Head Amp Gain > 0 dB
- Audio In 2 > Digital Gain > 0.0 dB
- Audio In 2 > Input Level > 0.0 dB
- Audio In 2 > Pan > Right
Note that if your external mixer is a single mono output, do not use Audio In 2 and set Pan for Audio In 1 to Center.
Finally, output a test tone from your audio mixer to calibrate the signal level. You may need to add a small amount of Head Amp Gain using the GAIN knob to get the signal level to match.
If you are not familiar with calibrating audio levels, you can skip this step, as the mix level will already be very close.
The stereo meter on the VR-4HD is in dBFS, a digital scale where the highest value is 0dB, and anything over that is clipping. This is not the same as a VU meter.
So, if you output a 1 kHz sine wave test tone at a +4 dBu reference level, it should appear as -16 dBFS on the VR-4HD, and 0 dBu reference would be -20 dBFS.
Note that dBu, VU, and dBFS are all different scales, so the values are different between each of them.
There are meters built into the VR-4HD for the main mix and the LCD screen for each input and output channel. If you want a more detailed meter, please use the RCS software.
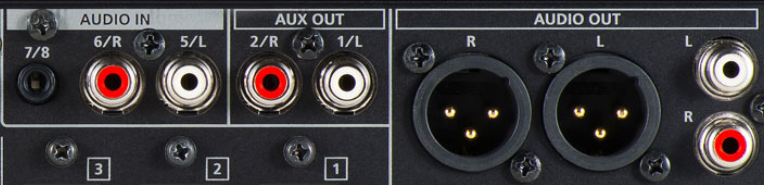
RCA Inputs 5 and 6
You can instead connect an audio mixer's RCA outputs to the the RCA inputs on the VR-4HD:
Then, simply adjust the 5/6 fader on the VR-4HD audio mixer to the bold line 3/4 of the way up:
If you need to run a long cable between the audio mixer and video switcher, consider using the XLR/TRS inputs for a balanced connection.
If your mixer only has RCA outputs, connect a short RCA cable to a line converter box, which will convert the output to XLR or TRS, and you can run that cable a long distance with a balanced connection.
Additional Tips
Once you have your final audio settings, it's recommended to create a backup file. This can be done saving a file to your computer using the VR-4HD RCS control software's menu.
More information is in this article and the RCS Owner's Manual.
If you have a number of people operating the VR-4HD, it may also help to enable Panel Lock. This is a feature located in the System menu that allows you to disable specific knobs and buttons on the VR-4HD. This is particularly helpful if you have an external audio mixer and do not want anyone to accidentally adjust the Master Output volume on the VR-4HD.
More information is in the Owner's Manual.